Calibration Blocks
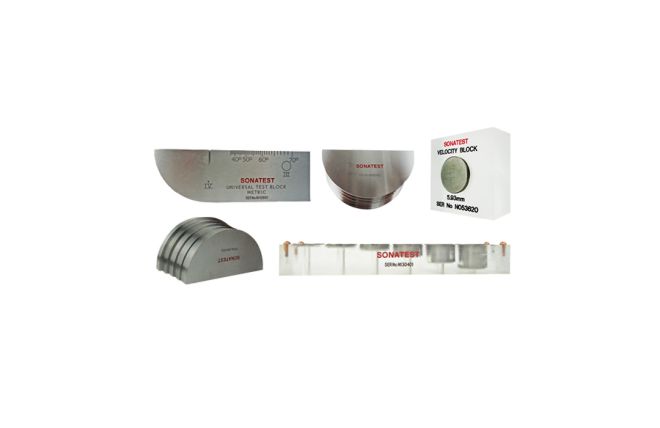
Calibration Blocks, or standards, for ultrasonic testing come in many shapes and sizes. The type of calibration block depends upon the NDE application and the form and shape of the subject being tested.

Overview
The material of the Reference Block should be the same as the material being inspected and the artificially induced flaw should closely resemble that of the actual flaw that the operator is testing for.
Sonatest provide a full range of Calibration Blocks. Above are outlined some of the popular types, however please email us for further information and details if you cannot find here the specific block you are looking for.
Features
Standard Calibration Blocks that are available include:
Calibration Block 1 (EN12223) A steel block for the calibration of ultrasonic flaw detection equipment used in material testing. Used for the calibration of shear and longitudinal transducers, determination of shear wave emission point, refracted angle. Also for measurement of sensitivity and resolution.
Calibration Block 2 (EN27963) For the ultrasonic examination of welds. To check angle transducers for beam angle and index point. Available in 12.5 mm and 20 mm thickness.
Sonatest Universal CBU Calibration Block For calibration of small shear wave and longitudinal transducers, determination of shear wave emission point, refracted angle and measurement of sensitivity and depth resolution. 50 mm radius.
Steel Step Wedge 1 mm to 8 mm in 1 mm steps. Each step is 20 mm x 20 mm. Used for checking the sensitivity of twin transducers on thin sections when using a flaw detector.
Steel Pipe Wedge Made from 50 mm diameter pipe with thickness steps of 10, 8, 6, 4 and 2 mm. This pipe wedge simulates steam boiler tubes in power stations and is used to calibrate flaw detectors of thin blue inspection.
Calibration Step Wedge Metric Series of steel discs set into a perspex block for calibration and linearity checking of thickness meters and flaw detectors. Wedge thicknesses 1.5, 2.5, 5.0, 10.0, 20.0 mm.
Velocity Block Equivalent to a 1µs thickness of a known velocity in steel. The block is mounted on perspex. Used to check the velocity of other materials with thickness meters.
Further Calibration Blocks available include:
- IOW A5 beam calibration blocks
- A6 & A7 resolution blocks complying to BS2704
- FB frequency block
- VW step wedge 1-8 mm
- CBU universal calibration blocks (50 mm radius)
- CBM thickness & CBV velocity blocks
- PW pipe step wedges 2-10 mm
- RTB radiused calibration block for boiler tube probes
- Aluminium V1 & V2 calibration blocks
- ASME test blocks
- EMAT calibration pipe step wedge
Accessories
| Product Code | Description |
|---|---|
| 149095 | Cal Block No.1 (V1) |
| 149205 | Cal Block No.2 (12.5 mm) V2 |
| 149273 | Cal Block No.2 (20 mm) V2 |
| 149093 | CBU Metric Test Block |
| 149097 | CBM Test Block (Thickness) |
| 149098 | CBI Test Block (Thickness) |
| 149099 | 8-Step test Block (VW) |
| 149118 | AMK/MPAUT Block |
| 149279 | DAC Calibration Block |
| 149288 | Test Block 2-25MM |
| 149289 | Universal test Block |
| PX-BRAC-BTB-BLOCK | Contoured Boiler Tube Calibration Block |
| PX-PACALBLK | Phased Array Calibration Block |
| 149080 | WP2 Test Block |
| TST-0007 | Carbon Steel PA Test Block |
| TST-0008 | Aluminium PA Test Block |
| 195080 | Case for V2 Test Block (BS A4) |
