- Blog
Notches vs. Side-Drilled Holes Chapter 3 – Crack Detection Sensitivity
21st January 2022
Paul Holloway, President, Holloway NDT & Engineering Inc.
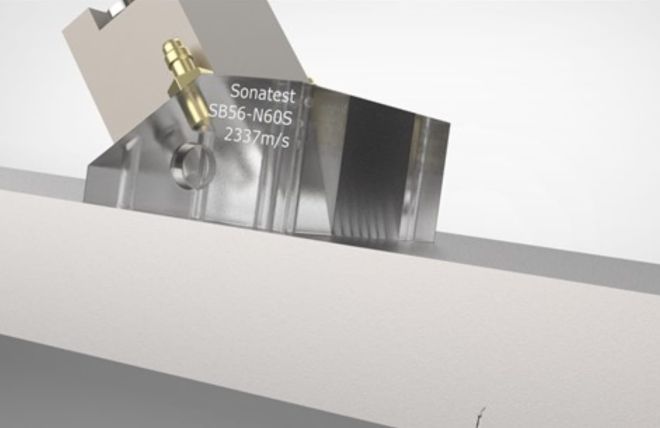
In previous chapters, we introduced some of the differences between side-drilled holes (SDH) and notches from a theoretical point of view, then we touched upon the major practical differences when it came to calibration sensitivity.
Now, in the culmination of the trilogy (riveting, I know), we disarm the rumour that notches are somehow better than SDHs for crack detection. Notches are not “better for cracks”. I assume phased array UT, but the same principles apply for conventional UT.
Notches Look More Like Cracks, So Why Aren't They Better?
The fact that a notch might look like a crack more than an SDH means almost zero when it comes to the probability of detection because real weld flaws are fractal and wiggly and reflection characteristics vary significantly with angle.
If you calibrate on notches because they're "better for cracks", then you assume the following baggage that comes along with it:
- You've assumed the crack you’re looking for is oriented straight vertical (not 80°, not even 85°) and…
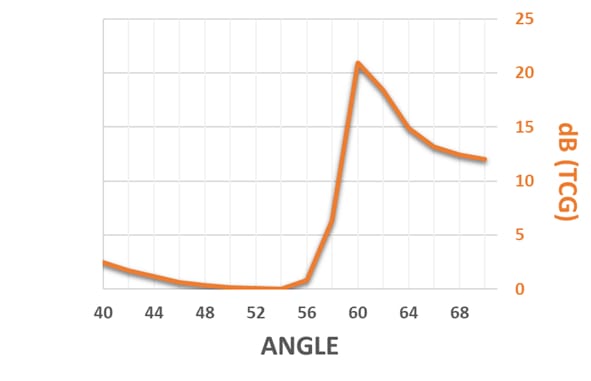
- You accept the fact that the calibration sensitivity will be skewed to boost everything (slag, cracks, LOF, etc.) starting at around 60°.
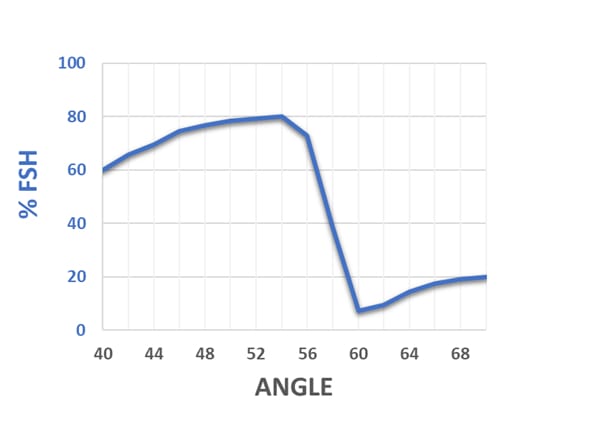
If you pass a basic sectorial focal law over a notch, the signal will wimp out right around 60° due to mode conversion losses…
… so the TCG curve works extra hard around 60° to bring everything up to a consistent level…
… and in the end the signal from the notch sits happily at your reference level.
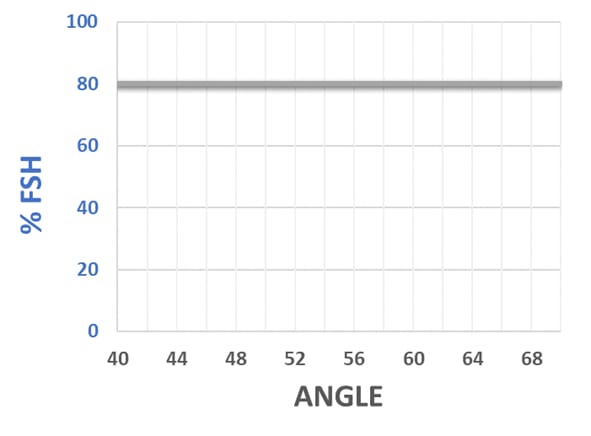
Ok, so you calibrated on notches and now you say “I’m perfectly sensitive across all angles!”. Well sure, this is great ONLY IF THE FLAW IS PERFECTLY VERTICAL.... which it isn't... unless it's a notch, and then it's not a weld flaw. It's your calibration block. You're looking at your cal block. Move over to the weld, and it's a completely different ball game.
What if the flaw is cockeyed by a measly 5° or 10°? Here's an example showing a crack skewed 10°, which doesn't look like a lot...
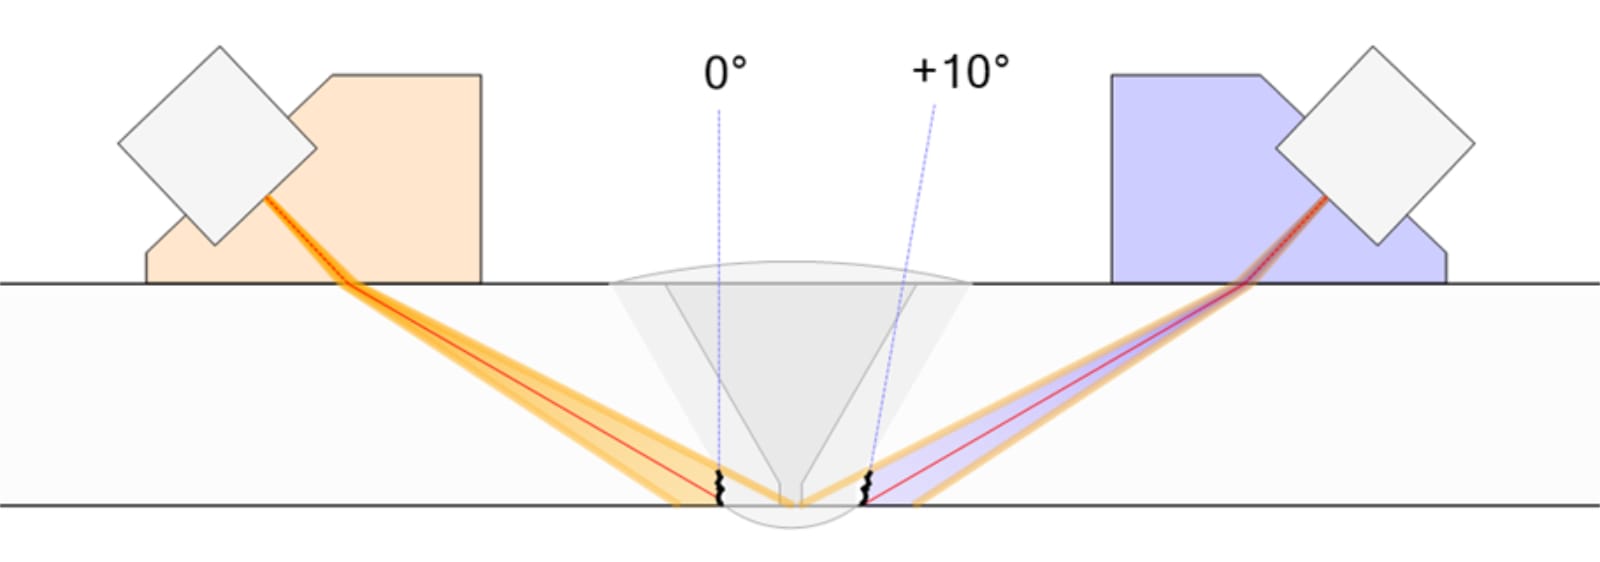
Just a few degrees can make a massive difference in signal response. Remember the chart from Part 1 with the precipitous plunge for a notch reflector at 60°? There was a drop from 100% screen height to about 10% screen height between 55° and 60°. That’s about 20 dB.
Are you okay with a calibration based on the assumption that a measly 5° or 10° tilt on your crack could reduce the amplitude by 20dB? Probably not.
What Did Notches Ever Do To Me?
I don’t hate notches; I just take issue with the fact that they get to be the de facto reference reflector when, in most cases, physics fails to show the benefit.
To prove there's at least a thread of ambivalence on my part I will say this… given ASME rules you’re better off using notches in the following cases:
- If the outside diameter of the pipe is less than about 3.5 inches (plus wall thickness considerations), you simply won’t have enough real estate to make a 1-½ inch (38 mm) long SDH through the ½ T thickness anyways

- The minimum diameter for an SDH according to ASME is 3/32 inch (2.5 mm). On thin wall (less than 5/16 in or 8 mm) the holes occupy a pretty substantial percentage of the overall thickness. The ASME code lets you freely choose notches or side-drilled holes, so for really thin sections it's probably best to go with a 10% notch.

So What?
Notches have been used for a bazillion UT inspections, helping find and size every weld flaw under the sun. Would side-drilled holes have changed anything? Absolutely! But so would a pile of other things… did you do a transfer correction? What couplant did you use? Was your wedge angle exactly nominal? How about surface prep? How hard did you push on the wedge?
There are lots of variables at play and we should try to control them as best we can. This is why there are codes and procedures. But we should do this without imparting other effects onto our inspections.
The shapes and orientations of weld flaws are so varied that when thickness permits we should use a calibration reflector that does not impart angle-dependence. For that reason, side-drilled holes are the better all-around sensitivity calibration reflector for general weld inspection. Plus, they're way easier to calibrate on. Way easier.
I promise I'll stop writing about notches and side-drilled holes now. Probably.
Please contact our Applications Team if you have any questions. You can also find more solutions on our website.
Stay up to date with our latest content. Sign up here to get our blogs delivered straight to your inbox.
News Filter...
The latest news from Sonatest direct to your inbox.
Tags
Related Products
